How to Add Multiple Email and Microsoft Accounts to Windows 10
Whether you use a local account or a Microsoft Account to sign into Windows 10, you may have other accounts that you use for specific apps. Maybe you have a Yahoo account for email, a Google account for calendar appointments, or an Outlook account for contacts. You might even have another Microsoft Account to run specific Microsoft apps and services.
All these accounts can be added directly to Windows 10, so you can access all that content in one convenient location. Here’s how to set it up.
Link Email Account
In Windows 10, go to Settings > Accounts > Email & accounts. Let’s say you want to add an email account so you can easily access messages sent to that account. We’ll use Yahoo as the test subject. Click Add an account and choose the email service you want to add.
Microsoft allows you to link Outlook, Office 365, Google, Yahoo, and iCloud. You can also choose a different account that uses POP or IMAP to receive email. Click the service you want to add, enter the username and password for the account, then confirm the decision.
Windows will show you what information the Windows Mail and Calendar apps need to access, such as Mail, Contacts, and Calendar. Click the Agree button to grant the necessary permissions. You may receive a notice asking if you want Windows to remember the sign-in name and password for this account so you don’t have to remember it yourself or enter it again.
Click Yes if you want to save your login information, then click Done. The account you added then appears in the list of ones used by email, calendar, and contacts.
While the steps to add each account are the same, some offer additional options. Under the broad category of Outlook, you can add a Live.com, Hotmail, or MSN account. Under Office 365, you can add an account that uses Office 365 or Exchange Server on the backend.
Add POP IMAP Accounts
If you need to add an account that’s not listed, click the Other account POP IMAP entry. You’d choose this option if you want to add an account for your ISP or a web-based account from a lesser-known online service. Enter your email address and password, then sign in and wait for your account to show up.
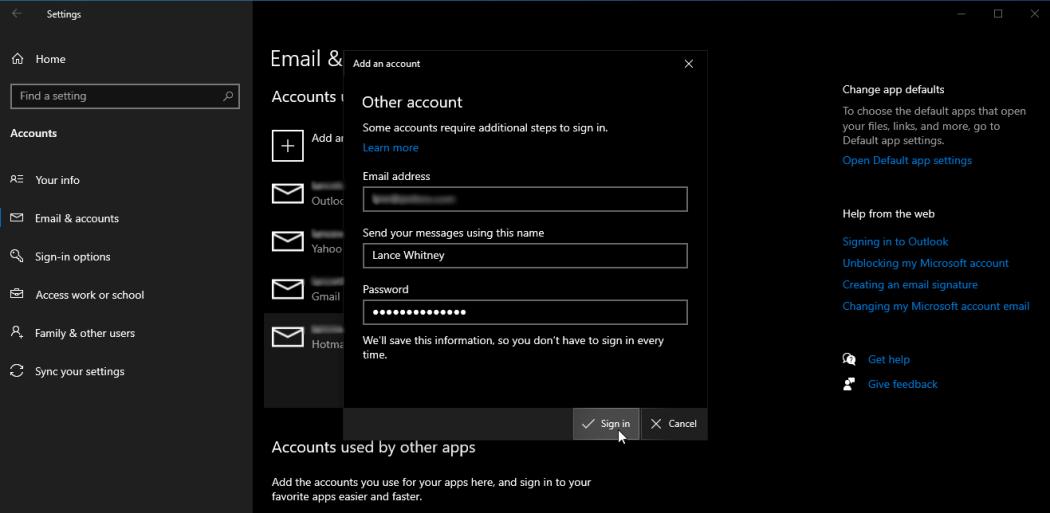
If you click Other account POP IMAP and Windows can’t locate or access your account, then it’s time to go the advanced route. Click Advanced setup, then choose either Exchange ActiveSync or Internet email. Exchange ActiveSync is a special protocol that lets mobile phone users access mail, contacts, and calendars from an Exchange server. In most cases, you’ll want to select the one for Internet email.
At the next window, enter your email address, username, password, account name, and sender name. You’ll also need to find and enter your service’s incoming and outgoing mail server names and select the account type. You can typically locate this information by running a web search on the name of your email provider followed by the terms “IMAP,” “ POP,” or “SMTP.”
Under Account type, select either POP3 or IMAP4, depending on which protocol you want to use. Keep the four options checked and click Sign in.
After you add an account, you may see a notice of “Attention required” prompting you to fix the account if it’s not properly set up or can’t be accessed. If you see this, click the Fix button and enter your password again to see if the problem goes away.
Manage Accounts Settings
You can control key settings for an account or remove it from Windows if you no longer need it. To do this, click the account you want to tweak, then click the Manage button. At the next window, click the Change mailbox sync settings option.
At the Sync settings window, review the settings to make any changes. You can choose to download new content as it arrives, every 15 minutes, every 30 minutes, hourly, or manually. You can also opt to always download the full message and internet images.
There’s an option to choose how much email you download—from the last 3 days, 7 days, two weeks, the last month, the last 3 months, or anytime. You can also decide what type of content you want to access from this account—email, calendar, and/or contacts. When finished, click Done. Then click Save to apply your changes.
To remove an account, select it and click the Manage button. At the next screen, click the Delete account from this device option. Click the Delete button to confirm the deletion and then click Done.
Once everything is set up, you can open the Windows Mail app to see all the accounts added in the left-hand pane. Click on a specific account to open that inbox. You can click the Calendar and People icons in the lower-left corner to view the appointments, events, and contacts from all your accounts.
Add Additional Microsoft Accounts
If you have more than one Microsoft Account, you can add them all to Windows, along with each of their contact lists, emails, and calendar events. Open Settings > Accounts > Email & accounts and click Add a Microsoft account under the Accounts used by other apps section.
Enter the email and password of the Microsoft Account at the Sign in window, then follow the prompts to sign in and authenticate the account. The additional Microsoft Account should then be listed under the Email & accounts section.
You can view mail, contacts, and calendar events from other Microsoft Accounts inside the Mail app. Click the Accounts entry on the left, then click Add account in the right pane. The Microsoft account you just added should appear at the top of the list. Click it and then click Done. The account is added to the Mail app, where you can now access its email, calendar, and contacts.
Sign up for Tips & Tricks newsletter for expert advice to get the most out of your technology.
EmailThis newsletter may contain advertising, deals, or affiliate links. Subscribing to a newsletter indicates your consent to our Terms of Use and Privacy Policy. You may unsubscribe from the newsletters at any time.
Thanks for signing up!Your subscription has been confirmed. Keep an eye on your inbox!

