How To: Downgrade iOS 12 Back to 11.4.1 on Your iPhone
Apple's goal with iOS 12 is to smooth out the problems with its famously flawed predecessor. Of course, change isn't for everyone, and by iOS 11.4.1, Apple had a pretty stable thing going. If you're not digging all the bugs and new features included in iOS 12, here's how to downgrade your iPhone back to iOS 11.4.1.
Since Apple just released iOS 12 on Monday, Sept. 17, it's a good guess that the company will stop signing iOS 11.4.1 in October sometime. When Apple released iOS 11, they stopped signing iOS 10.3.3 just 15 days after, so you can expect a similar time frame. After this point, it will be impossible to downgrade from iOS 12 unless you saved your SHSH2 blobs, which I'm guessing many of you have never even heard of.
You'll be able to go back to the last version of iOS 11 using iTunes for macOS or Windows, as long as you archived an iOS 11 backup before updating to iOS 12. However, you can still downgrade to iOS 11 without a backup, only you will have to start with a clean slate.
Step 1: Disable 'Find My iPhone'
As with any restore, you'll want to disable Find My iPhone, though this can be done later when erasing the device since you'll be prompted to do so. It's just easier to get it out of the way first so there are no hiccups later.
First, open the Settings app, then tap your name at the top of the list and select "iCloud." On the following page, scroll down and tap "Find My iPhone," then disable "Find My iPhone." Enter your Apple ID password when prompted, and Find My iPhone will be disabled.
Step 2: Download the IPSW File for Your iPhone
Next, download the iOS 11.4.1 IPSW file for your particular iPhone using the links below. We've included iPad and iPod Touch links for your convenience. This is the firmware file you'll use with iTunes to roll back your device. All of the links below are from Apple's servers, so you don't have to worry about security.
The files above are rather large, so it may take a while to download the one your device needs. If you're on a Mac, it the download file should appear in your "Downloads" folder.

Step 3: Connect Your iPhone to iTunes
Once the appropriate file has finished downloading, connect your iPhone to your Mac or Windows computer using a Lightning to USB or Lightning to USB-C cable, whichever works best for your computer. Hopefully, iTunes opens automatically. If not ...
You may have to unlock your iPhone. Check to see if an "Unlock iPhone to Use Accessories" notification is on your lock screen. If so, unlock your device. After doing so, you may also have to trust your computer if it's the first time connecting to the computer. Also, iTunes may prompt you to install an update in order to connect the iOS 12 device, so make sure to do so.
Once it's connected to iTunes, you should see the phone icon appear next to the media dropdown as well as under "Devices" in the sidebar. Click on either options to go to your Summary screen for your device.
Step 4: Install iOS 11.4.1 on Your iPhone
If you're using a Mac, hold down the Option key and click on "Restore iPhone" in the Summary screen for your iPhone in iTunes. For PC users, hold down Shift instead while doing the same thing.
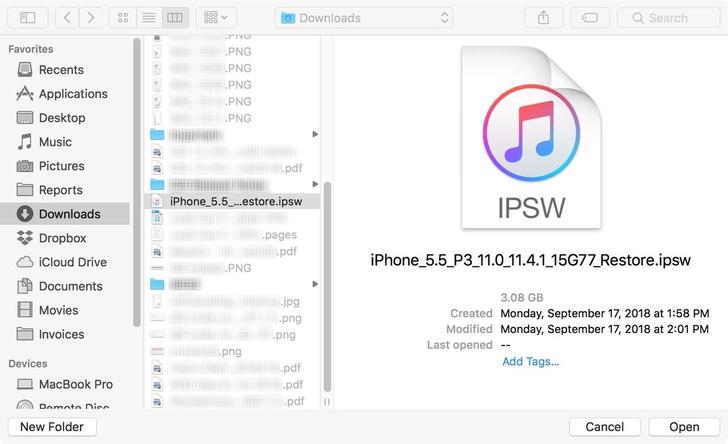
A file browser menu will appear, so when it does, find and select the IPSW file that you downloaded in Step 2 above. Click "Open" once it's selected.
Next, a popup will appear in iTunes informing you that iOS 11.4.1 will be installed on your iPhone. Click "Restore" on this prompt to confirm, then it's just a waiting game from here. During the installation process, you may need to enter your passcode on the iPhone, so don't walk away while it's doing its magic.
When your iPhone has finally rebooted and appears on the welcome screen to start setting up iOS 11.4.1, it's okay to disconnect your iPhone from the computer. The rest can be down wirelessly.
Step 5: Restore Your iPhone from a Backup
Since your iPhone has essentially erased itself, you'll need to run through the initial setup steps.
When restoring with your archived backup, make sure you're still connected to iTunes and select your iPhone in the application. From there, select "Restore Backup," then choose your archived backup file from the list, and hit "Restore." (An archived backup will have the data and time in the actual backup name, as opposed to other backups that will just have the device name only.)
If your archived backup of iOS 11.4.1 is encrypted, you'll need to enter your password to continue.
Wait for the restore to complete before disconnecting your iPhone. It should restart, and it will need to sync with iTunes. Once it's done syncing, you have successfully downgraded to iOS 11.4.1 with all your data intact.
Keep Your Connection Secure Without a Monthly Bill. Get a lifetime subscription to VPN Unlimited for all your devices with a one-time purchase from the new Gadget Hacks Shop, and watch Hulu or Netflix without regional restrictions, increase security when browsing on public networks, and more.
Buy Now (80% off) >
Other worthwhile deals to check out:
Cover image by Justin Meyers/Gadget Hacks; Screenshots by Jake Peterson/Gadget Hacks


